

How To Install Cooler Master 212 Evo
| Contents of Installation Kit | ||||||||
 |  |  | ||||||
| Ten-bracket | Back Plate | Fan Brackets | ||||||
 |  |  |  |  | ||||
| Standoffs 10 4 | Nut Setter x one | Nuts x 1 | Screws 10 4 |
| ||||
| 1. Secure Back plate to the motherboard | ||||||||
 | 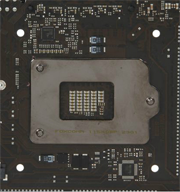 | |||||||
| Intel Socket (Tiptop View) | Intel Socket (Bottom View) | |||||||
| 2. Identify the back plate on board as shown Below. (Brand sure that the covered feet of subclass are touching the bottom of the board.) | ||||||||
| | ||||||||
| iii. Place the standoffs through the board from the top and secure them with a nut as shown below. | ||||||||
 |  | |||||||
 | ||||||||
| Note: Installing cross-corner can make the install easier | ||||||||
| One time all 4 standoffs are installed, you may flip over the board to finish install. | ||||||||
| 4. Adhere the cooler to the CPU Socket | ||||||||
| a. First, Remove the protective layer of plastic on the bottom of cooler | ||||||||
 | ||||||||
| b. Apply a small bead of thermal Paste to one edge of the CPU. | ||||||||
 | ||||||||
| c. Concord a flat-edge at a 45 degree angle to the chip and slowly drag a even layer of paste beyond the top of the CPU. | ||||||||
  | ||||||||
| d. When finished the CPU should wait something like the picture. | ||||||||
 | ||||||||
| due east. Place cooler on height of socket | ||||||||
 | ||||||||
| f. Align the x bracket correctly | ||||||||
 |  | |||||||
| Correct | Incorrect | |||||||
| g. Set the bracket pins to the correct socket setting for your motherboard. | ||||||||
| 1) Press down on screw to slide the pin to each hole. | ||||||||
 | ||||||||
| 2) Adjust the slide pin to the correct socket | ||||||||
 |  |  | ||||||
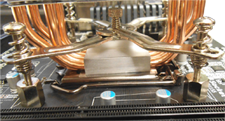
| h. NOTE: The pocket-size standoff on the heatsink aligns with the tiny groove on the side of subclass. | ||||||||
 |  | |||||||
| i. Secure all for screws on the bracket. Going cantankerous-corner will make the install easier | ||||||||
 | ||||||||
| 5. Connect the Fan | ||||||||
| a. Attach the fan to the mounting brackets with the supplied screws and encompass the screws with the supplied fan pads as shown beneath. | ||||||||
 | ||||||||
| b. Attach the fan as shown below, by clipping the fan to the groove on the estrus sink. | ||||||||
 | ||||||||
| 6. Connect Fan to the motherboard CPU Fan | ||||||||
| a. Connect the fan to the 4 pin CPU fan location on your motherboard. (Please refer to motherboard manufacturer for CPU fan location). | ||||||||
 | ||||||||
| b. (option 2) Connect the Fan 4 Pin connector to the 3 pivot CPU fan location on the motherboard.(Please refer to motherboard manufacturer for CPU fan location). | ||||||||
 | ||||||||


Source: https://landing.coolermaster.com/faq/hyper-212-series---intel-installation/
Posted by: conklinlacquit79.blogspot.com
0 Response to "How To Install Cooler Master 212 Evo"
Post a Comment