

How To Install Webpack 4
![]()
Anton Melnyk
Posted on • Updated on
Webpack Tutorial How to configure Webpack 4 or 5 from scratch for a basic website
🌼 Introduction
Hello, reader! 🐱
As y'all may know, configuring Webpack can be a frustrating task. Despite having adept documentation, this bundler isn't a comfortable horse to ride for a few reasons.
Webpack squad is working really hard and relatively apace developing it, which is a good thing. However, information technology is overwhelming for a new programmer to learn all stuff at one time. Tutorials are getting old, some plugins break, found examples tin can be confusing. Sometimes y'all can be stuck at something trivial and google a lot to detect some brusk message in GitHub bug that finally helps.
There is a lack of introductory manufactures about Webpack and how information technology works, people rush directly to tools like create-react-app or vue-cli, but one sometimes needs to write some simple plain JavaScript and SASS with no frameworks or any fancy stuff.
This guide will expect at step-by-step Webpack configuration for ES6, SASS, and images/fonts without any framework. It should exist enough to start using Webpack for nearly simple websites or use it as a platform for farther learning. Although this guide requires some prior noesis most web-development and JavaScript, it may be useful for someone. At least I would be happy to meet something like this when I started with Webpack!
🎈 Our goal
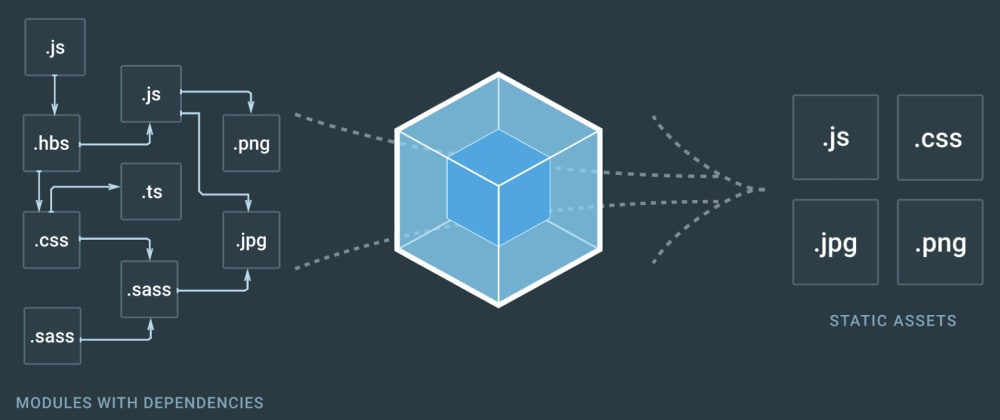
We volition be using Webpack to bundle our JavaScript, styles, images, and fonts files together into one dist folder.

Webpack will produce one arranged JavaScript file and ane bundled CSS file. You can simply add together them in your HTML file similar that (of course you should change path to dist folder if needed):
<link rel="stylesheet" href="dist/bundle.css"> <script src="dist/package.js"></script>
And you are good to go 🍹
You can look at the finished example from this guide: 🔗link.
Annotation: I updated dependencies recently. This guide applies to the latest Webpack five, but config keeps working for Webpack 4 in case you need information technology!
🔧 Get started
1. Install Webpack
We use npm: $ npm init command to create a parcel.json file in a projection folder where we will put our JavaScript dependencies. Then we can install Webpack itself with $ npm i --save-dev webpack webpack-cli.
2. Create entry point file
Webpack starts its job from a single JavaScript file, which is called the entry point. Create index.js in the javascript folder. You can write some simple lawmaking here similar console.log('Hi') to ensure it works.

3. Create webpack.config.js
... in the project folder. Here is where all ✨ magic happens.
// Webpack uses this to work with directories const path = require ( ' path ' ); // This is the main configuration object. // Here, yous write different options and tell Webpack what to exercise module . exports = { // Path to your entry signal. From this file Webpack will begin its piece of work entry : ' ./src/javascript/index.js ' , // Path and filename of your result bundle. // Webpack will parcel all JavaScript into this file output : { path : path . resolve ( __dirname , ' dist ' ), publicPath : '' , filename : ' parcel.js ' }, // Default fashion for Webpack is production. // Depending on mode Webpack will apply dissimilar things // on the final bundle. For now, we don't need production's JavaScript // minifying and other things, so let's gear up manner to development style : ' development ' };
4. Add npm script in package.json to run Webpack
To run Webpack, nosotros have to apply npm script with simple command webpack and our configuration file every bit config option. Our packet.json should expect similar this for now:
{ " scripts " : { " build " : " webpack --config webpack.config.js " }, " devDependencies " : { " webpack " : " ^iv.29.6 " , " webpack-cli " : " ^3.ii.iii " } }
5. Run Webpack
With that bones setup, y'all tin run $ npm run build command. Webpack volition look up our entry file, resolve all import module dependencies inside it and bundle it into unmarried .js file in dist folder. In the console, you should come across something like this:
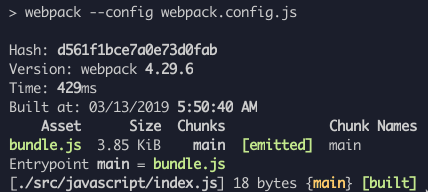
If you lot add together <script src="dist/parcel.js"></script> into yout HTML file yous should see Hi in a browser console!
🔬 Loaders
Great! Nosotros accept standard JavaScript bundled. But what if we desire to use all absurd features from ES6 (and beyond) and preserve browser compatibility? How should we tell Webpack to transform (transpile) our ES6 code to browser-compatible code?
That is where Webpack loaders come up into play. Loaders are one of the primary features of Webpack. They utilize certain transformations to our lawmaking.
Let'south add together to webpack.config.js file new option module.rules. In this option, nosotros will say Webpack how exactly it should transform different types of files.
entry : /* ... */ , output : /* ... */ , module : { rules : [ ] }
For JavaScript files, we will use:
1. babel-loader
Babel is currently the best JavaScript transpiler out there. We will tell Webpack to employ it to transform our modern JavaScript lawmaking to browser-compatible JavaScript code before bundling it.
Boom-boom-loader does exactly that. Permit'southward install information technology:
$ npm i --save-dev babel-loader @babel/core @boom-boom/preset-env
Now we are going to add rule about JavaScript files:
rules : [ { exam : / \. js$/ , exclude : / ( node_modules ) / , employ : { loader : ' babel-loader ' , options : { presets : [ ' @babel/preset-env ' ] } } } ]
-
testis a regular expression for file extension which we are going to transform. In our case, it'southward JavaScript files. -
excludeis a regular expression that tells Webpack which path should be ignored when transforming modules. That ways we won't convert imported vendor libraries from npm if we import them in the future. -
useis the main rule's option. Here nosotros set loader, which is going to exist practical to files that stand for totestregexp (JavaScript files in this case) -
optionstin can vary depending on the loader. In this case, we gear up default presets for Babel to consider which ES6 features it should transform and which not. It is a divide topic on its own, and you lot tin can swoop into information technology if y'all are interested, but information technology'south safe to go on it similar this for at present.
At present y'all can place ES6 code inside your JavaScript modules safely!
2. sass-loader
Time to piece of work with styles. Usually, nosotros don't want to write evidently CSS. Very often, we use SASS preprocessor. We transform SASS to CSS and then utilize car prefixing and minifying. Information technology's a kind of "default" approach to CSS. Let's tell Webpack to do exactly that.
Permit's say we import our chief SASS file sass/styles.scss in our javascripts/index.js entry point.
import ' ../sass/styles.scss ' ;
Simply for now, Webpack has no idea how to handle .scss files or any files except .js. We need to add proper loaders and so Webpack could resolve those files:
$ npm i --relieve-dev sass sass-loader postcss-loader css-loader
We can add a new rule for SASS files and tell Webpack what to do with them:
rules : [ { test : / \. js$/ , /* ... */ }, { // Utilize dominion for .sass, .scss or .css files test : / \.( sa|sc|c ) ss$/ , // Prepare loaders to transform files. // Loaders are applying from correct to left(!) // The start loader will exist applied after others utilize : [ { // This loader resolves url() and @imports within CSS loader : " css-loader " , }, { // And then we apply postCSS fixes like autoprefixer and minifying loader : " postcss-loader " }, { // Starting time we transform SASS to standard CSS loader : " sass-loader " options : { implementation : require ( " sass " ) } } ] } ]
Note important thing most Webpack hither. Information technology can chain multiple loaders; they will be applied one by ane from terminal to the kickoff in the employ assortment.
Now when Webpack meets import 'file.scss'; in code, it knows what to do!
PostCSS
How should we tell to postcss-loader which transformations information technology must apply? We create a separate config file postcss.config.js and utilise postcss plugins that we demand for our styles. You may constitute minifying and autoprefixing the almost basic and useful plugins to make sure CSS is set for your real web site.
Offset, install those postcss plugins: $ npm i --salve-dev autoprefixer cssnano.
Second, add them to postcss.config.js file like that:
module . exports = { plugins : [ require ( ' autoprefixer ' ), require ( ' cssnano ' ), // More postCSS modules here if needed ] }
You lot can dive into PostCSS deeper and detect more plugins that suit your workflow or projection requirement.
Subsequently all that CSS setup only one thing left. Webpack volition resolve your .scss imports, transform them, and... What's next? It won't magically create a single .css file with your styles bundled; nosotros have to tell Webpack to do that. But this task is out of loaders' capabilities. We have to use Webpack's plugin for that.
🔌 Plugins
Their purpose is to do anything else that loaders tin't. If nosotros need to extract all that transformed CSS into a separate "bundle" file, we accept to employ a plugin. And there is a special 1 for our instance: MiniCssExtractPlugin:
$ npm i --save-dev mini-css-extract-plugin
We can import plugins separately right at the start of the webpack.config.js file:
const MiniCssExtractPlugin = require ( " mini-css-excerpt-plugin " );
After our module.rules array where we set loaders add new plugins code where nosotros actuate our plugins with options:
module : { rules : [ /* ... */ ] }, plugins : [ new MiniCssExtractPlugin ({ filename : " bundle.css " }) ]
Now we can concatenation this plugin into our CSS loaders:
{ test : / \.( sa|sc|c ) ss$/ , apply : [ { // After all CSS loaders, nosotros use a plugin to practise its work. // It gets all transformed CSS and extracts information technology into separate // single bundled file loader : MiniCssExtractPlugin . loader }, { loader : " css-loader " , }, /* ... Other loaders ... */ ] }
Done! If you followed forth, you lot could run $ npm run build command and find bundle.css file in your dist binder. General setup now should wait like this:

Webpack has tons of plugins for different purposes. You can explore them at your need in official documentation.
🔬 More than loaders: images and fonts
At this point, you should catch upward on the basics of how Webpack works. But nosotros are non done yet. About websites need some assets: images and fonts that nosotros gear up through our CSS. Webpack can resolve groundwork-prototype: url(...) line thanks to css-loader, merely information technology has no idea what to exercise if yous set URL to .png or jpg file.
We need a new loader to handle files inside CSS or to exist able to import them correct in JavaScript. And hither it is:
file-loader
Install it with $ npm i --save-dev file-loader and add a new dominion to our webpack.config.js:
rules : [ { examination : / \. js$/ , /* ... */ }, { test : / \.( sa|sc|c ) ss$/ , /* ... */ }, { // Now nosotros apply rule for images test : / \.( png|jpe ? k|gif|svg ) $/ , use : [ { // Using file-loader for these files loader : " file-loader " , // In options we tin set different things like format // and directory to relieve options : { outputPath : ' images ' } } ] } ]
Now if you utilise inside your CSS some image like this:
body { background-paradigm : url('../images/cat.jpg') ; }
Webpack volition resolve it successfully. Y'all volition find your image with a hashed name inside dist/images folder. And inside bundle.css you will discover something like this:
body { background-image : url(images/e1d5874c81ec7d690e1de0cadb0d3b8b.jpg) ; }
As y'all tin encounter, Webpack is very intelligent — information technology correctly resolves the path of your url relatively to the dist folder!
You can as well add together a rule for fonts and resolve them similarly to images; change outputPath to fonts folder for consistency:
rules : [ { test : / \. js$/ , /* ... */ }, { examination : / \.( sa|sc|c ) ss$/ , /* ... */ }, { examination : / \.( png|jpe ? g|gif|svg ) $/ , /* ... */ }, { // Apply rule for fonts files test : / \.( woff|woff2|ttf|otf|eot ) $/ , apply : [ { // Using file-loader too loader : " file-loader " , options : { outputPath : ' fonts ' } } ] } ]
🏆 Wrapping up
That's information technology! A elementary Webpack configuration for a classic website. Nosotros covered the concepts of entry point, loaders, and plugins and how Webpack transforms and bundles your files.
Of course, this is quite a straightforward config aimed to sympathise a general idea about Webpack. There are many things to add if you demand them: source mapping, hot reloading, setting up JavaScript framework, and all other stuff that Webpack can do, but I feel those things are out of the telescopic of this guide.
If you struggle or desire to acquire more than, I encourage you to cheque Webpack official documentation. Happy bundling!

Source: https://dev.to/antonmelnyk/how-to-configure-webpack-from-scratch-for-a-basic-website-46a5
Posted by: conklinlacquit79.blogspot.com
0 Response to "How To Install Webpack 4"
Post a Comment