

How To Install 2 Outlets In One Box
How to Install Electrical Outlets in the Kitchen
How to Install Electrical Outlets in the Kitchen
![]() Time
Time
A full day
![]() Complication
Complication
Intermediate
![]() Cost
Cost
$51–100
Introduction
Not that long ago, the average kitchen counter was home to a toaster, coffeemaker and maybe a blender, but things have changed. It'due south getting harder to detect an available outlet to plug everything in. Extension cords and power strips are unsightly and can exist unsafe. The only existent solution is to add more outlets.
Tools Required
Getting Started
Outlet Amps and Wiring
We tracked down an electrician who, not surprisingly, adds kitchen outlets all the time. He showed us how he adds an outlet to a kitchen backsplash past running conduit through the back of the cabinets. This method is fast, cheap, super elementary, and best of all, doesn't crave a whole bunch of wall repairs or painting. This article shows how to install 1 new outlet, but you can add together several past post-obit like steps. Kitchens demand to be on a dedicated 20-amp circuit and require 12-judge wire. Today, 12-judge wire is wrapped in a yellow sheath, merely your old cablevision may exist white. New circuits in kitchens need both arc mistake and ground mistake excursion interruption (AFCI, GFCI) protection. In this story, nosotros're adding an outlet to a kitchen that already has GFCI protection, which has been required for many years. If your kitchen is not on a twenty-amp excursion, or doesn't have GFCI protection, you'll have to install a new circuit or circuit breaker. For more data, bank check out Breaker Box Rubber: How to Connect a New Circuit. As well, hash out your project with your local electrical inspector when you use for a permit. If adding a excursion withal seems above your pay grade, then telephone call an electrician.
The beginning step is to shut off the power. If your billow panel is poorly labeled, plug a radio into the outlet you programme to pull power from, and start shutting downwardly breakers until the music stops. There may also be wires from other circuits in the junction box, so probe the box with a noncontact voltage tester (endeavor the Klein-NCVT-ane) before you disconnect any wires. Cover the ends of the existing wires with wire nuts as an additional precaution.
Caution: If you discover aluminum wiring, telephone call in a licensed electrician who is certified to work with it. This wiring is dull gray, not the dull orangish that is characteristic of copper wire.
Project step-by-step (xiii)
Pace i
Remove the existing box
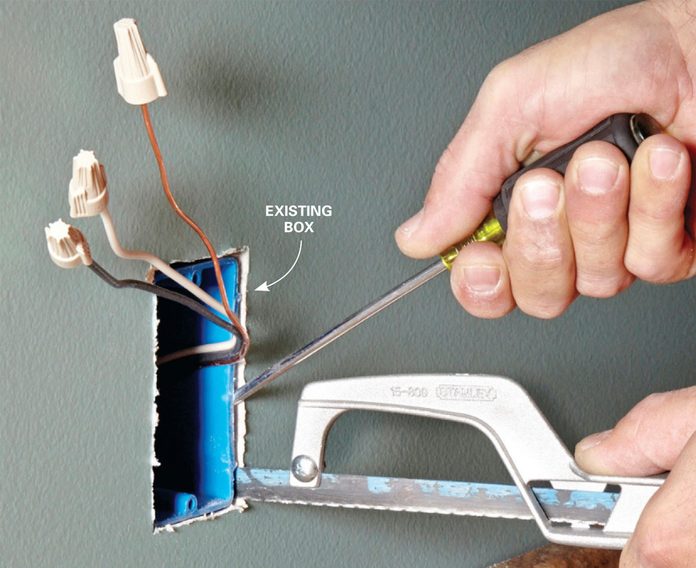
It'due south easier to fish the new cable if you remove the existing box in the wall. Fiberglass boxes can be busted out with a hammer and a chisel or sturdy screwdriver. It's all-time to cutting the nails on plastic boxes with a hacksaw. Start by probing with a screwdriver to find which side of the box the stud is on. Then pry the screwdriver between the stud and the box to make room for the saw blade.
Note: Metal boxes are difficult to remove without creating some drywall repairs. Before you attempt it, come across if you can fish the cable downwardly through the existing metal box into the pigsty in the chiffonier.
Stride ii
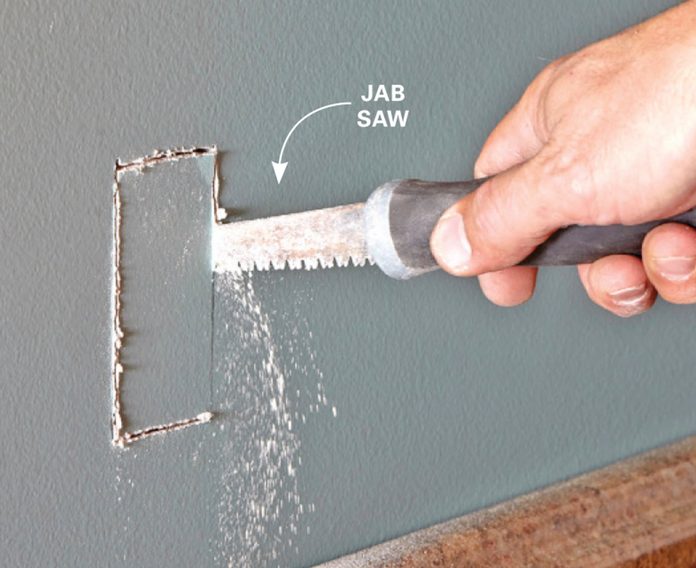
Cutting a hole for the new box
Standard Outlet Heights
- In that location's no rule mandating the superlative of the new box, so just match the elevation of the existing one.
- The code for kitchens states that there must exist an outlet within a 2-ft. reach from anywhere along the countertop, excluding those areas where in that location'south a sink or stovetop. This means there should be an outlet every 4 ft.
- If you lot're just calculation i outlet, yous probably won't exist subject to this dominion, just if you're remodeling the entire kitchen, yous probably will. It'south best to bank check with your local electrical inspector.
Before cut the hole, go to the floor beneath and, if possible, cheque to see if there are any pipes or ducts running through the wall yous program to cut into. Or go outside and see if any vents are sticking through the roof in that area. If you're not sure, make a small-scale exploratory pigsty that can be easily patched.
The new box does not have to be right up against a stud. In fact, information technology's easier to install if it'due south not. Trace around the new box, and cutting the hole with a jab saw. Don't shove the saw all the way into the wall cavity, only in case there's a wire or pipe hidden backside the wall.
If your backsplash is tiled, use a rotary tool fitted with a diamond tile-cutting flake. Set the depth of the bit so it cuts through the tile simply. Finish the cut with a jab saw. Whenever possible, utilise the grout lines for two sides of the pigsty because cutting volition be much easier. Drill starter holes in two reverse corners with a glass-and-tile drill bit.
![]()
Step 3
Drill the holes for the cable
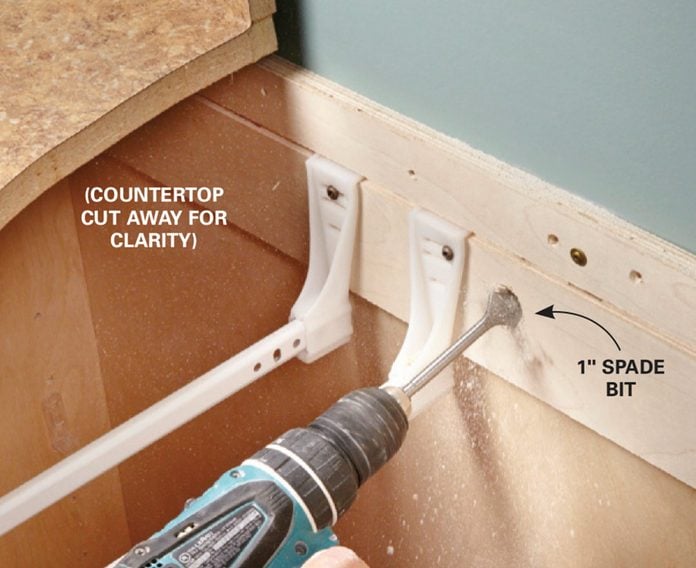
Empty the cabinets, and pull out the drawers to get better access. Lying on your back halfway inside a cabinet is not the virtually comfortable position, so throw down a couple of couch cushions earlier yous get started. And be sure to wear center protection. Drill a i-in. hole for the new cable in the cabinet-almost the pinnacle. Don't let the bit travel likewise far into the wall cavity, or the insulation may twist upwardly like cotton candy on a stick and make information technology hard to pull the bit back out. Drill through the sides of the cabinet almost the back for the conduit to pass through.
Step 4
Fish in the new cable
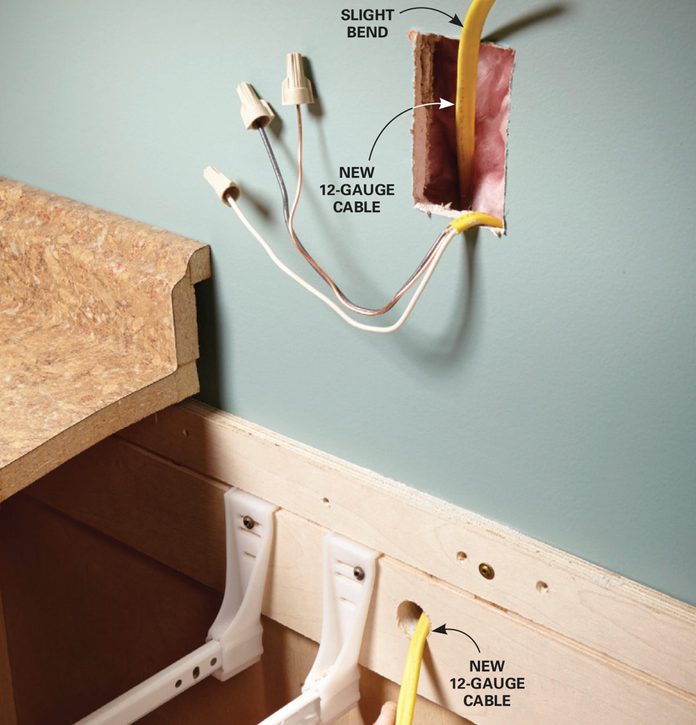
Measure the distance the new cable will travel both horizontally and vertically, so add several feet before cutting it-it's better to throw out a few anxiety of cablevision than end up short. Shove one end of the cable through the hole upward toward the box hole. It doesn't matter if you lot get-go at the new or the existing outlet side. Our expert puts a slight bend on the end of the cablevision so it hugs the dorsum of the drywall. This will help keep it from getting hung up on insulation.
Pace five
Prep the conduit
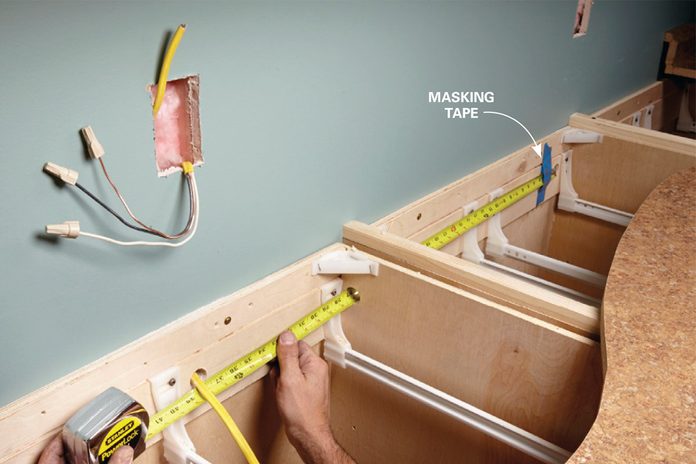
Measure the length of the flexible conduit by sliding a record measure through the holes in the side of the cabinet. Have a buddy hold the terminate of the tape in the hole or secure it with masking tape. Cutting the conduit to length and adhere a bushing or fitting to the side you plan to push the wire through. Bushings and fittings protect the cable from getting damaged on the abrupt edges of the conduit. Our expert likes the 90-degree plumbing fixtures because it results in a nice 'finished' look with no cablevision exposed. A standard bushing will issue in a small department of exposed cable at the ends, merely that'southward adequate.
Step 6
Slide the conduit into place
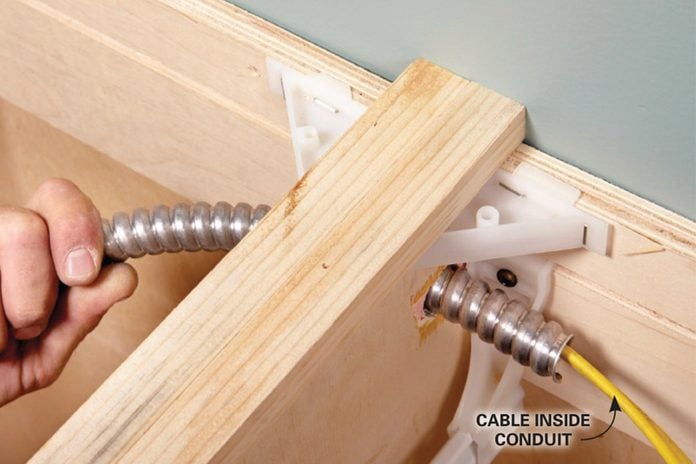
Push the cable through the conduit and so information technology sticks out a few inches on the other side, and so slide the conduit through the one-in. holes in the side of the cabinets. Once the conduit is through, install the bushing/fitting on the other end of the conduit, and pull the cable the rest of the fashion through the conduit.
Step 7
Secure the conduit
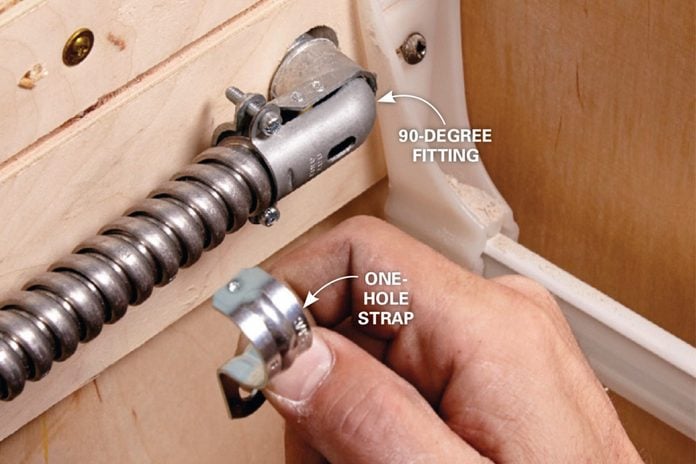
Push the cable up through the second hole in the wall the same way you did the first, and and then secure both sides of the conduit with straps most the hole. If the conduit travels more than than halfway across the length of the cabinet, add together another strap halfway betwixt the end of the conduit and the pigsty in the cabinet.
Pace 8
Install the new boxes

It's easier to remove the cable capsule before installing the new 'erstwhile work' boxes, but brand certain to leave enough on the cable and then about an inch of sheathing pokes into the box. Once the sheathing is removed, pull the wires into the box, slide information technology into identify and secure it.
There are several kinds of 'old piece of work' boxes, sometimes chosen 'remodel boxes.' 'Old work' boxes don't go nailed to a stud just instead are secured with wings that clamp onto the drywall equally a spiral is turned. The blazon shown hither is fabricated from sturdy fiberglass and is available at near abode centers.
In this wiring scenario, five individual 12-gauge wires are occupying the source box (all grounds count as one), then the 18-cu.-in. box shown here is large enough to handle all the wires and receptacle without crowding. Y'all may need a larger box if there are six or more wires.
Stride 9
Effigy A: Diagram of new cable and conduit

Install a tamper-resistant AFCI receptacle at the source outlet as shown in Figure A. The outlets downstream tin can be standard tamper-resistant receptacles.
Footstep 10
Wire the new receptacles
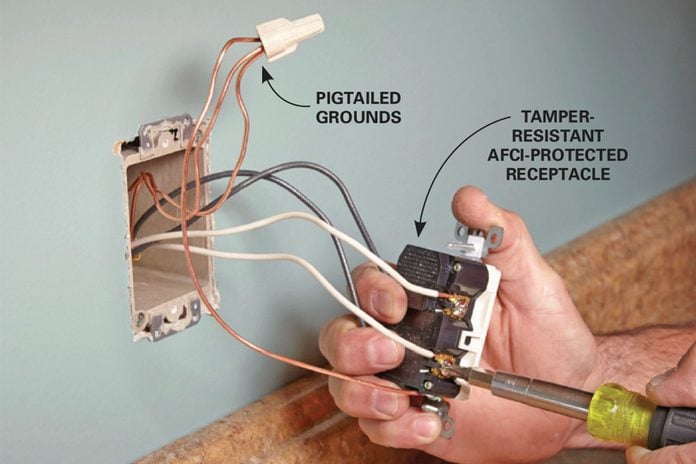
All outlets in a kitchen require AFCI and GFCI protection. In this example, we're working with a kitchen circuit that already has GFCI protection at some point upstream, which ways that we simply need to install a receptacle that has AFCI protection. I properly wired AFCI outlet volition protect all the other 20-amp outlets downstream. Virtually all newly installed receptacles demand to exist tamper resistant, then look for the 'TR' before you lot buy.
Step 11
Figure B: AFCI receptacle wiring diagram
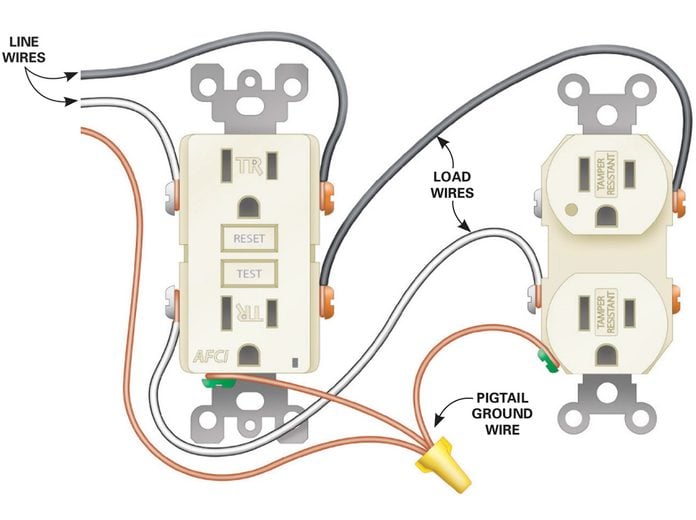
All the line (incoming) and load (approachable) wires need to be in their proper places (Effigy B). If you've wired receptacles before, you may have used 'pigtails' to connect them. That's where the hot, neutral and ground wires run continuously with small pigtail wires pulled off and connected to each receptacle. Using pigtails is a great manner to ensure that if one receptacle goes bad, the balance downstream stay operational. But when wiring GFCI and AFCI receptacles, just the ground wires can be hooked up with pigtails; otherwise the outlets downstream will not exist protected.
Step 12
Planning to tile?
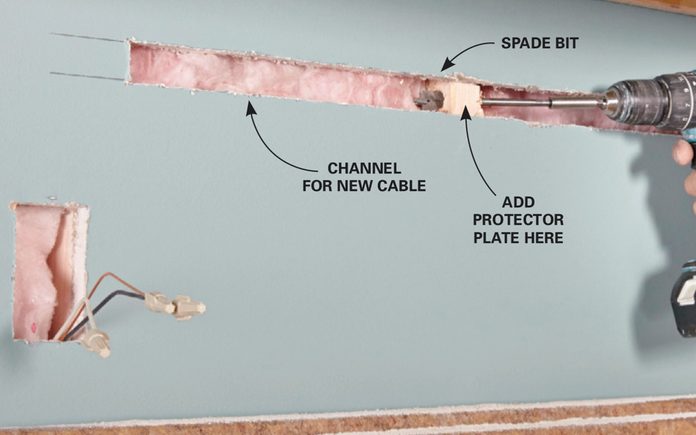
If y'all plan to tile your backsplash, calculation outlets is even easier than we show here. Just run the new cable through a channel in the drywall. A channel is easier because y'all don't accept to empty out the cabinets or mess around with conduit, and the wall can be quickly patched. Make the channel with a jab saw. Cut it a fleck higher than the boxes and so in that location's room to bend the cablevision down into the pigsty. Install a steel blast plate to protect the cable from future nails or screws.
Footstep thirteen
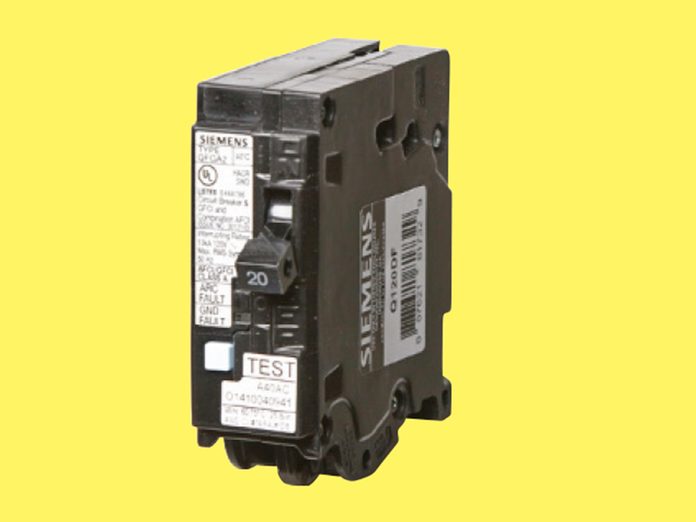
Dual-Part Breakers
A ground error occurs when electricity travels outside its intended path (wires), and seeks the shortest route to the ground (you lot). H2o is oft the cause of a ground mistake. That's why, for many years, kitchens, baths and outdoor outlets required GFCI protection, which shuts downwards the power before injuries occur. An arc error occurs when electricity jumps from its proper conductor to an unintentional conductor. Common causes are pinched wires, frayed or croaky wire insulation, and wires damaged past screws, nails or staples.
An arc fault can cause a burn down, which is why AFCI protection has recently been mandated by the new electric code for most of the house. Until recently, the but way to achieve both GFCI and AFCI protection on the same excursion would be to install one form of protection in the console and the other in the first available receptacle. At present there are dual-function breakers available that offer both types of protection. The twenty-amp billow shown hither costs $50 at domicile centers. Wait for dual-function outlets in the near futurity.
Additional Information:
- Figure A: Diagram of new cable and conduit
- Effigy B: Wiring diagram for AFCI receptacle
Every product is independently selected past our editors. If y'all buy something through our links, we may earn an affiliate commission.
Originally Published: November 26, 2022

Source: https://www.familyhandyman.com/project/how-to-install-electrical-outlets-in-the-kitchen/
Posted by: conklinlacquit79.blogspot.com
0 Response to "How To Install 2 Outlets In One Box"
Post a Comment